How to create a complete new module in ADempiere
Note:
DISCLAIMER - This is an implementation guide written by Kittiu, from ecosoft Bangkok. Other contributors are welcome to discuss on improving it.
Overview
ADempiere is a great Business Application. What make ADempeire different from others are not only its complete business features, but indeed its ability to extend its features. ADempeire Application Dictionary Framework is very flexible and powerful. ADempiere is great about openness. All the technique has been document and discussed openly in this Wiki. The only thing developer need to do is to find and get familiar with all the concept, and try to connect all the jigsaw together. Which is in a way, quite difficult.
In this tutorial, we will be using a real usable yet simple module that I developed from a requirement of ADempiere ERP Project in Thailand. I will walk you through techniques needed to build a new module. And along the way, I will be referring to the more completed source of documentation. As such, it is highly recommended that the reader dig into each of the technique and try to understand them along with the tutorial.
I hope this tutorial will get you started...faster!
--Kittiu 14:01, 7 August 2011 (UTC), ecosoft
Business Requirement for this tutorial
We will call this new module - Billing. In some countries, at least for Thailand, there is a customary practice for companies to collect money from their customers only once in a month. For example, the customer has 3 payments due in a given month, the vendor or billing company should group all the due AR Invoices in a document call Billing Document and issue it with all the invoices consolidated to the customer on the Billing Day. The customer will be paying based on the payable amount shown in Billing Document in the following month.
What is in this tutorial?
Techniques used in the tutorial includes,
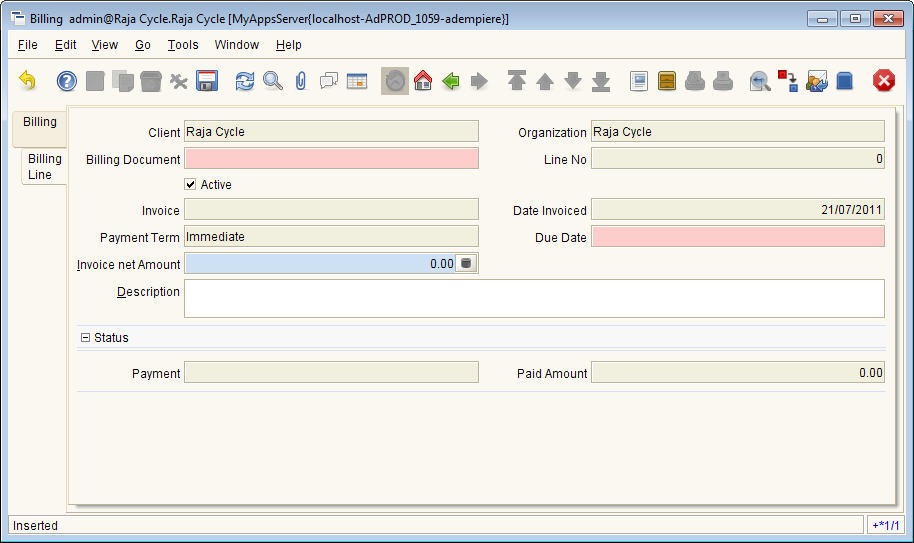
- New Window & Table - Billing / Billing Line [1]
- Billing Window is the main UI for the new functionality
- Billing Tab will be used as document header for the group of Invoice. User will specify the Business Partner and the Billed Date
- Billing Line Tab will be used to list all the due invoices, which are either generated by the criteria in Billing Tab or manually add in
- New Document Type - Billing [2]
- Couple of Validation Rules will be configured to make proper screening of data [3]
- Java Callouts used by field in Billing Tab [4]
- Java Process - Create Billing Lines from matched criteria in Billing tab [5]
- Jasper Report to create a new Billing Form which can be printed right from the Billing Tab [6]
- Model Validator Technique that will intercept some processes into Payment Document's existing process [7]
- For training purposes, download the source code (Billing_src.zip), PackIn package (Billing.zip), and a sample Jasper form (Billing_Form.jrxml) from DOWNLOAD HERE (as ADempiere Wiki now does not accept zip files, so I have to host them on Bitbucket).
Sample Test Steps
Following are the use case of this new module. We will be testing them along with development steps.
A customer has made 3 orders during the month. Sales orders are completed, and the goods has been shipped. Now it is the process of invoicing.
- User prepares 3 Invoices (Customer) issued to that customer. Let's give these invoices a due date at the end of the working month.
- It is the normal practice (at least in Thailand) that customers will accept invoices from vendors only once a month. So, before that date, the user creates 1 Billing Document that summarizes the 3 invoices.
- Print out the Billing forms and their associated Invoice forms. These forms will be printed out and issued to the customer.
- Once money is paid by customers, the user uses the Payment window to process the AR Receipt. Allocate the Receipt Line with the help of the Billing Document.
- User completes the AR Receipt, and the information (AR Receipt's DocNo) will be referenced back to the underlying Billing Document.
Development Steps
Enough introduction, let's get our hands dirty!
Step 1: Prepare Your Customization Environment
Recommended reading: Create your ADempiere customization environment
In this tutorial, we assume that we only have 1 project "ADempiere360LTS" setup and functional. We will be creating a new Eclipse Project called "BillingModule" as our custom project.
- On your Eclipse, create a new Java Project called "BillingModule"
- Add ADempiere360LTS to this project build path
- Create Run Configuration for this new project
- Run ADempiere from this Run Configuration
Step 2: Create new Entity Type
This is one noteworthy step before we start any development. The Entity Type determines the ownership of Application Dictionary entries. Normally, entity (i.e., Window, Fields, Rules, etc...) are marked as "Dictionary" which means, ADempiere own entities. It is a good practice to always create a new Entity Type for your project. This will tell you which component belongs to your project.
It could be anything, but in this tutorial we will be using our Entity Type called, ECS_LCO (Ecosoft Thai Localization)
- Run ADempiere from Eclipse
- Login as System Administrator
- Open Entity Type window
- Click New
- Entity Type: ECS_LCO
- Name: Thai Localisation
- ModelPackage: org.ecosoft.model (<--this will be used as default package later on when we run GenerateModel)
- Click Save
From now on, when you create any new components, set Entity Type to "ECS_LCO" when ever applicable.
Step 3: Create Billing Tables and Window
Recommended reading: NewWindow, How to create a new document with specific accounting
In this step, we will be creating a new Window (Billing) with 2 tabs (Billing and Billing Line). In normal practice, you will be using Application Dictionary to create the window. But for this tutorial purpose, it will be using too much time to create windows and fields one by one. Instead, we will install the pre-built package, Billing.zip downloaded form previous step. The Billing.zip is a 2Pack Package that I have created (PackOut) from my previous implementing of Billing module. 2Pack is a very useful feature when come to migration and worth experimenting in detail.
Per say, we will use the ready to use Billing.zip to create,
- Billing window with 2 tabs, Billing and Billing Line
- 2 database tables for the UI, C_Billing and C_BillingLine
- Some other required component, i.e., Field Validator, etc.
To install Billing.zip
- Login as System Administrator
- Open window "PackIn - Import a package"
- New
- Package Source Type: File
- Package Source: (Select the Billing.zip)
- Package Directory: migration (<-- PackIn will copy and expand Billing.zip in this directory)
- Update system maintained application dictionary: Not checked
- Save and click to process "PackIn"
Note:
The brief steps if create new window manually are
Login as System Administator Use Table and Column window to create new table, "C_Billing" and "C_BillingLine" Create Columns for both tables (we can also copy from existing table) Click "Synchronize column" button to create underlining tables in Database Use Window, Column and Field window to create a new window, "Billing" and 2 tabs, "Billing", "Billing Line" Assign C_Billing table to Billing Tab and C_BillingLine to Billing Line Tab Click "Create Fields" button to create fields from columns Rearrange fields position and behavior (i.e., mandatory, readonly, etc...)
- Once the Tables and Windows are created (from PackIn), please review and see how they are configured. Open the "Window, Tab and Field" window and the "Table and Column" window and look for new Windows/Tables. Some notes on Columns/Fields here:
Fields required on all Windows/Tables in ADempiere:
- AD_Client_ID, AD_Org_ID --> Identify data owner
- C_Billing_ID --> Table ID
- Created, CreatedBy, Updated, UpdatedBy --> Updated automatically by PO object
- IsActive --> Good practice as active/inactive record
Fields required as we want this Billing window to be a "Document Type" window:
- C_DocType_ID, DocumentNo, DocAction, DocStatus, Processed --> Document control fields
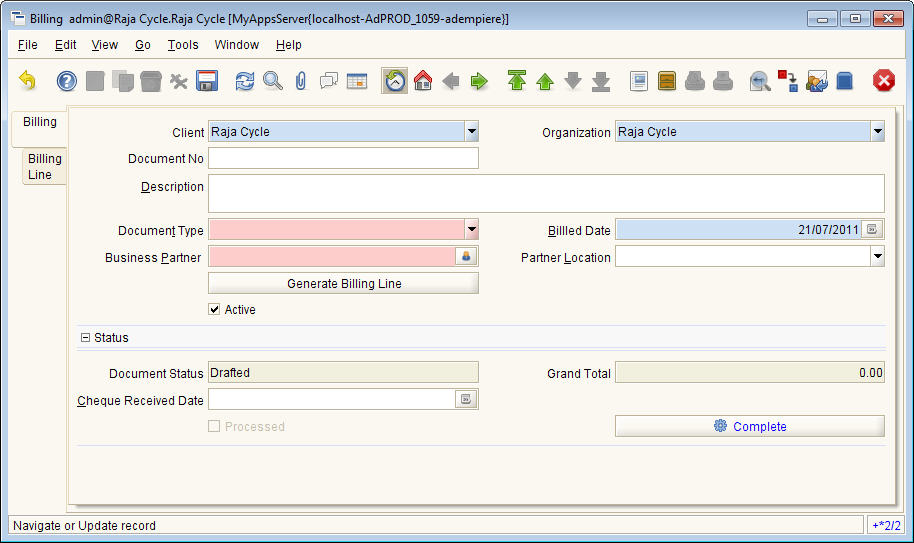
Explore the new window!
- Login as GardenAdmin, open the Billing window (located under menu Quote-to-Invoice --> Sales Invoices). Then, explore Billing and Billing Line tabs.
- You will notice from the window layout,
- Billing is the main tab, Billing Line is the sub tab.
- Some fields are mandatory.
- Some callouts are being called, but not yet implemented.
- Buttons are in place, but no process is attached, i.e., Generate Billing Line, Button to change DocAction.
- Etc... (the best way to understand is to open the Application Dictionary of this window alongside).
- Login as System, open the window, Window, Tab & Field and search for Billing.
- Billing tab is the main tab --> Tab Level = 0
- Billing Line tab is the sub tab --> Tab Level = 1
- Explore Table and Column for C_Billing:
- AD_Client_ID --> Default logic = @#AD_Client_ID@, Mandatory
- C_Billing_ID --> Key Column, Mandatory
- C_Bpartner_ID --> Reference = Search, Callout = org.ecosoft.model.CalloutBilling.bPartner, Dynamic Validation = C_BPartner (Trx)
- Explore Table for C_BillingLine:
- C_BillingLine_ID --> Key Column, Mandatory
- C_Billing_ID --> Parent Link Column
- Line --> @SQL=SELECT NVL(MAX(Line),0)+10 AS DefaultValue FROM C_InvoiceLine WHERE C_Billing_ID=@C_Billing_ID@
- Etc… (these setups come from the Billing.zip, some of them are already functional, some are not, i.e., CallOut java class)
Step 4: Generate Model Class for Billing and Billing Line model
Recommended reading: NewWindow#Generate_Model
After previous step, we now have a new Billing window with its associate table. Though CRUD (Create/Read/Update/Delete) functionality is available, it is not yet very useful. Next step is to extend its functionality, we will have to create Model classes for them.
With Model class, we can make the control over the object (aka Window/Table) better. ADempiere provide a GenerateModel process to help generate Interface and PO Extension classes (I_ and X_ classes getter/setter).
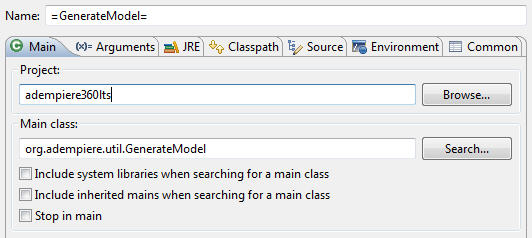
- On your Eclipse, create a new Run Configurator, call it Generate Model.
- Project: ADempiere360LTS.
- Main class: org.adempiere.util.GenerateModel.
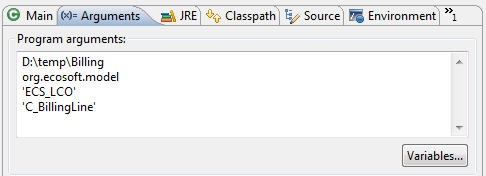
To generate classes, use the following Arguments:
- D:\temp\Billing --> where output classes will be placed. Ensure this folder is prepared, as ADempiere won't create it automatically.
- org.ecosoft.model --> package
- 'ECS_LCO' --> Entity Type (our new tables have been marked as ECS_LCO)
- 'C_Billing' --> Table to lookup
Run the configuration, and the classes will be created in the D:\temp\Billing folder.
Repeat the same steps to generate model classes for C_BillingLine.
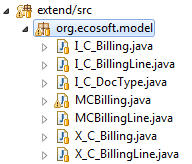
After completing the above steps:
- Navigate to D:\temp\Billing.
- You should see 4 java files generated: I_C_Billing.java, X_C_Billing.java, I_C_BillingLine.java, X_C_BillingLine.java.
Note: for the new model classes, you will notice in the file that, its package is org.ecosoft.model. This is because we have specified it in Entity Type
I_ and X_ are interface and get/set classes generated by GenerateModel class, and hence should not be modified. There is no implementation logic in these classes yet. Next we have to create the real model-extension class where the logic reside. As a rule of thumb, the name of Model for C_Billing table will be "MCBilling" (prefix with "M" and takeout "_"). More information about extending model can be found here.
As such, we will be creating 2 new model extension classes.
org.ecosoft.MCBilling.java org.ecosoft.MCBillingLine.java
Note that, these classes will extend the getter and setter classes (X_ classes) in previous steps. We can add more logic when a billing record is, i.e., saved, deleted, completed, etc. For training purpose we will be using the pre-written class provided in this tutorial.
Step 5: Making Billing a Document Type
Recommended reading: How to create a new document with specific accounting
If it is for window that simply keep master data, all implementation in previous steps is enough. But if the window will become a transaction data, or in the term of ERP system, become a "Document", this step is necessary. Becoming a Document will embed the following behavior 1) have document status 2) have period control 3) have document workflow and 4) can create accounting fact (optional).
In our example, Billing is a kind document, but it will not have to create accounting fact.
To register for new Document Base Type - "Billing", first, we will be registering the new type into References window.
- Login as System, open References window
- Lookup for C_DocType DocBaseType
- Select the List Validation tab and add a new entry
- Search Key: BIL
- Name: Billing
- Entity Type: Thai Localisation
Note: In our case, the Billing.zip already created it.
Extending C_DocType for new DocType
- There is a class in ADempiere X_C_DocType.java (located in base/src org.compiere.model) which contains all constants of document types in the system. As we have new DocType, at first glance it would be easy to overwrite it to accommodate the new DocType, i.e., in this case to add a Constant into existing X_C_DocType.java
/** Billing = BIL */
	public static final String DOCBASETYPE_Billing = "BIL";
- But overwriting the existing class is not a good practice, the BETTER way is --> in our BillingModule project directory create a new interface (I call it "Extension Interface"), I_C_DocType.java that extend the existing I_C_Doctype.java
package org.ecosoft.model;

public interface I_C_DocType extends org.compiere.model.I_C_DocType
{
	public static final String DOCBASETYPE_Billing = "BIL";
}
Note: More suggestion on extending the interface class was discussed by User:Teo_sarca here.
Up to here, all the model classes necessary for new model is created, let's install all the new classes into Eclipse.
To add this new Billing document type to use, i.e., for "Garden World" client.
- Login to client "Garden World" using GardenAdmin role.
- Run process Verify Document Type --> This will make Billing a new Document Type. I.e., Register Billing (BIL) in Document Type window, create Billing's Document - Actions, create Billing Document's Workflow, create Calendar Periods for it, etc...
- Run process Role Access Update --> This ensure that, people are granted access right to execute the document process. This tutorial will not go in-dept about the Java Code. But you can explore MCBilling.java and MCBillingLine.java and see what additional logic we try to achieve - when some event occur with Billing document
Now, from eclipse, stop and rerun the Application and notice changes,
What are added?
In Billing Window
- Create new Billing record
- Document Type = Billing (now exists)
- Document No is now running
- Clicking the Complete button, DocAction is shown
In Workflow window
- You will see new Document Process for Billing
In Calendar Year and Period window
- You will see periods for new Billing Document Type
In Role window
In Document Action Access, you will see all DocAction for new Billing Document Type

Up to this point, the new window is functional. But according to the Business Requirement, we still miss some important pieces of code.
- Callout: To make the UI more interactive, filling one field triggers the retrieval and automatic filling of information in other fields.
- Process: To execute an internal process by clicking a button in the Billing window.
- Report: To display the Jasper Form of the Billing document when clicking on the Billing window's Print Preview.
- ModelValidator: To enhance interaction with other existing processes without modifying the existing code.
We will see them in the next steps
Step 6: Create Java Callout
Recommended reading: Callout
What we want to achieve with callout class here?
Get the billing location for the selected Business Partner Register the callout class
- Login as System, open Table and Column window
- Look for C_Billing table, C_Bpartner_ID column
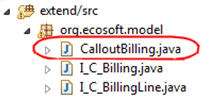
- Make sure that the callout is org.ecosoft.model.CalloutBilling.bPartner
- This explains that when C_Bpartner_ID is changed, it will call the method bPartner() of class CalloutBilling
- Create a class CalloutBilling in the package org.ecosoft.model
Note:
For this tutorial, we can use the source code provided in Billing_src.zip.
Test the callout
- Start Adempiere from Eclipse.
- Login as GardenAdmin, open Billing window.
- Select the Business Partner, and now you should see that the Location field is changed to the billing address automatically.
Note: Callout class is extended from Callout Engine class. When the function is called, the caller will provide the information as following -- Properties ctx, int WindowNo, GridTab mTab, GridField mField, Object value
Step 7: Create Java Process
Recommended reading: Process
What we want to achieve with Generate Billing Lines process?
What we want to achieve with Generate Billing Lines process?
- Create billing lines based on the open invoice of the selected customers which their due date are not beyond due date on the billing.
Register the Process class
- Login as System, open Report & Process.
- Create a new process.
- Search Key: GenerateBillingLine.
- Name: Generate Billing Line.
- Data Access Level: Client + Organization.
- Classname: org.ecosoft.process.GenerateBillingLine.
- Save the record.
- No parameter required (RECORD_ID will be passed to the process by default).
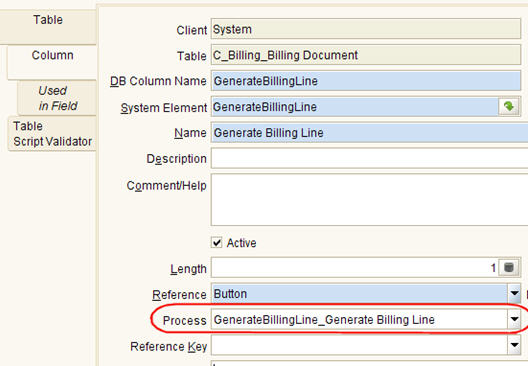
- Open Table and Column window.
- Look for C_Billing table, GenerateBillingLine column.
- You will notice that this column is of reference type "Button". Clicking the button will trigger the process.
- Make sure that the process is set as GenerateBillingLine_Generate Billing Line.
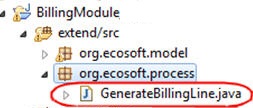
- Create a class GenerateBillingLine in the package org.ecosoft.process
- For training purpose, we will use the pre-written class. But please notice from the code to learn how it works.
Note: Up to this point, the general use of Billing window is ready. User can create new Billing record. Provided the Invoice DueDate and Business Partner, clicking on Generate Billing Line button will create Billing Line based on the invoices that meet the criteria.
Test: Create new Billing that summarize invoices (customer)
As the process will look up for the completed invoices that match the criteria on the Billing window, i.e., Business Partner, Billing Date, before running this test, make sure you created and completed Invoice (customer) for this Business Partner, i..e, C&W Construction (Invoice's Due Date + Payment Term < Billing Date).
Create Billing document for a specific customer
- Login as Garden Admin, open Billing window
- New Billing record, i.e.,
- Document Type: Billing
- Business Partner: C&W Construction
- Due Date: End of Month (cover all the completed invoices that reach the due date)
- Billing Location will be automatically selected (by callout)
- Click on Generate Billing Lines button, and click OK to confirm create lines
Note: This process will lookup for all completed AR Invoices for this Business Partner that has due date (after payment term) before or equal the due date, then create them as Billing Lines.
- You should notice the billing lines as following,

- And on Billing tab, notice the Checque Received Date = n/a as customer did not pay yet. Now, complete this document!

Next we will make it more useful by making a Jasper Form for this window and make it more interactive with other existing process using ModelValidator.
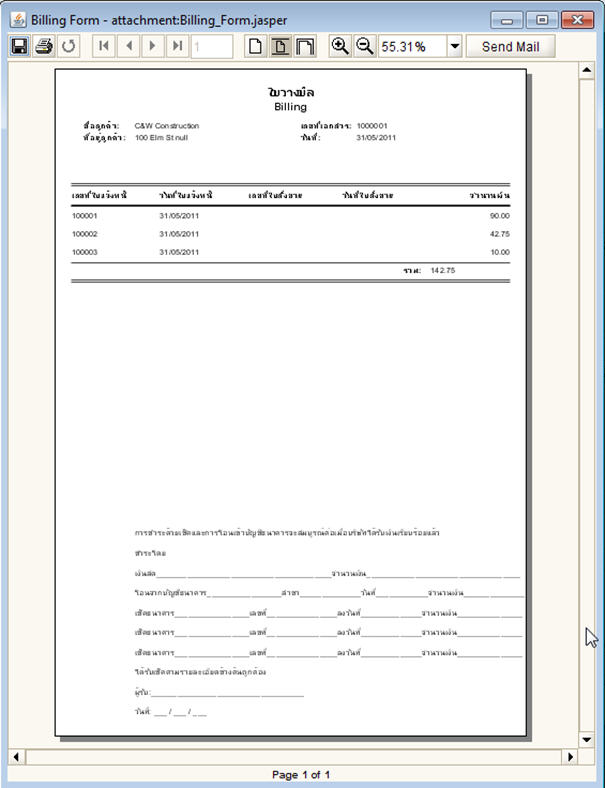
Step 8: Register Jasper Report for Billing Form
Recommended reading: Using Jasper Report Form in place of Standard Forms
Although the Billing document is completed, you will notice that the Print Preview button is not available. This is because there is no form register for this window yet.
Create a new Jasper Form using iReport
- For training purposes, we will be using a ready-to-use form named "Billing_Form.jrxml".
- Explore this form. This is a simple Jasper Report form, but do notice the input parameter - RECORD_ID. This parameter is passed by ADempiere when the user clicks on the Print Preview button.
- Compile and test this form by previewing it. Jasper will open up the input parameter box "RECORD_ID". Please enter the Billing Record ID (C_Billing_ID) that you want to test.
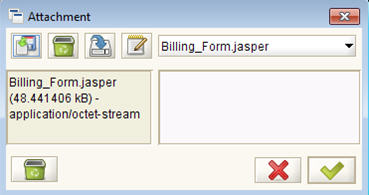
- You will find the compiled version of Billing_Form.jrxml as "Billing_Form.jasper" in the same folder.
Register new Billing Form to Billing Tab
- Open Report & Process window
- New
- Search Key: BillingForm
- Name: Billing Form
- Data Access Level: Client + Organization
- Report: Checked
- Jasper Report: attachment:Billing_Form.jasper
- As we are using the attachment: directive, we will attach the .jasper file directly with this record.
- Click on the Attachment icon on the menu, and attach Billing_Form.jasper.
Note: There are more better ways of deploying Jasper Report, you can read it here.
For the simplicity of the tutorial, we will use attachment.
Register the Billing Form with Billing Tab
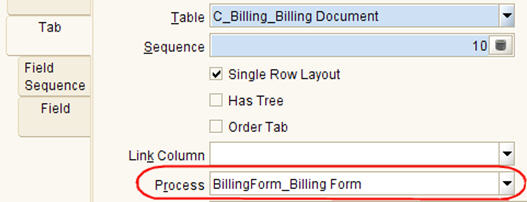
- Open Window, Tab & Field window
- Lookup for Billing Tab, set the Process to BillingForm_Billing Form
Test: Print Preview - Billing Form
- Login as Garden Admin, open Billing window, and find our last active record.
- Now, as the form got registered, the Print Preview button will now be enabled
- Simply click on the Print Preview button
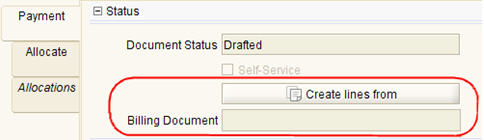
Step 8: New Java Process - Generate Lines from Billing Process (Payment window)
Start from this step, we will be enhancing the existing Payment window to be able to interact with the Billing module. When doing the AR Receipt on Payment window, by clicking at a button, user should be able to allocate invoices based on the issued Billing Document.
Before we can do that, we need to have a new Button "Create lines from..." button and a new field "Billing Document". And like previous steps, we will be registering new Java Process to that button.
But again, for this tutorial, our Billing.zip package has created those necessary Application Dictionary elements for us. Please refer to Application Dictionary for table C_Payment (column - CreateForm and C_Billing_ID) and window Payment (field - Create lines form... and Billing Document) on how they are configured.
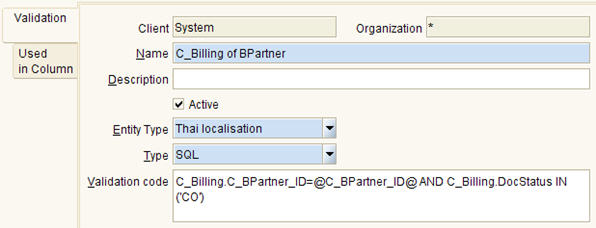
Setup new Dynamic Validation Rule (used for the process window)
Login as System, open Validation window
Validation Rule
- Name: C_Billing of BPartner
- Entity Type: Thai Localisation
Validation Code (SQL): C_Billing.C_BPartner_ID=@C_BPartner_ID@ AND C_Billing.DocStatus IN ('CO')
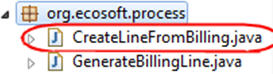
Register the Process Class
- Open Report & Process window
- New
- Search Key: CreateLineFromBilling
- Name: Create Line From Billing
- Data Access Level: Client + Organization
- Classname: org.ecosoft.process.CreateLineFromBilling
- Click on Parameter Tab, New
- Name: Billing Number
- DB Column Name: C_Billing_ID
- System Element: C_Billing_ID
- Reference: Table Direct
- Dynamic Validation: C_Billing of Bpartner
- Save the record
Register the new process – Generate Lines from Billing
- Open Table and Column window
- For C_Payment table, look for CreateFrom column,
- Make sure that process is CreateLineFromBilling_Generate Lines from Billing
On Eclipse, also register the new Java Class
- Create a class CreateLineFromBilling.java in the package org.ecosoft.process
Test: AR Receipt, allocate the Receipt with the help of Billing Document
After getting the payment from customer, create the new AR Receipt
- Restart Adempiere from Eclipse.
- Login as GardenAdmin.
- Run the Role Access Process to ensure that the user has rights to the new process.
- Open the Receipt window.
- Create a new AR Receipt document.
- Select Business Partner: C&W Construction.
- Click on the "Create lines from…" button. This will show the Billing Document popup window.
Select the Billing Number from previous step and click OK. This will create Allocation lines from Billing lines.

Step 8: Intercept other process with ModelValidator
Recommended reading: ModelValidator
What we want to achieve with Model Validator?
- ModelValidator is the good way to intercept existing process without overwrite the existing code.
- This case, we want to intercept the process in AR Receipt document process
- After COMPLETE the Payment (receipt) Document, update the Billing Document associate with it
Register the ModelValidator class
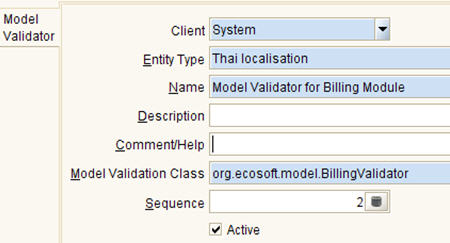
- Login as System, open Model Validator window.
- Create a new record.
- Entity Type: Thai Localisation.
- Name: Model Validator for Billing Module.
- Model Validation Class: org.ecosoft.model.BillingValidator.
- Sequence: 2.
- Save the record.
Note: ModelValidator can be registered in both System and Clint level. In this case, we are registering at System level.
- Create a class BillingValidator in the package org.ecosoft.model
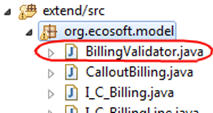
You can read the code in BillingValidator.java and notice how event is registered for C_Payment
Test: Complete the AR Receipt
Complete the AR Receipt
- Restart Adempiere from Eclipse.
- Login as GardenAdmin.
- Open the Receipt window and look for the AR Receipt record from the previous step.
- On the Receipt tab, fill in the receipt amount (i.e., 142.75 USD).
- Complete the AR Receipt Document.
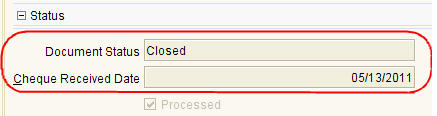
See the effect of AR Receipt document complete to the referenced Billing Document.
- Open to the referred Billing Document
- Now you will see document status changed to Closed
- And Cheque Received Date is now updated
Step 9: Deploy Billing.jar Package
Now, we have all the functionalites we need for this new module. Meanwhile, we still run it directly from Eclipse. For development period, this is ok. But what if we want to use it on our production server?
So, next, let's deploy! The concept is easy, just make the Billing.jar file out of the Eclipse and deploy them in the server.
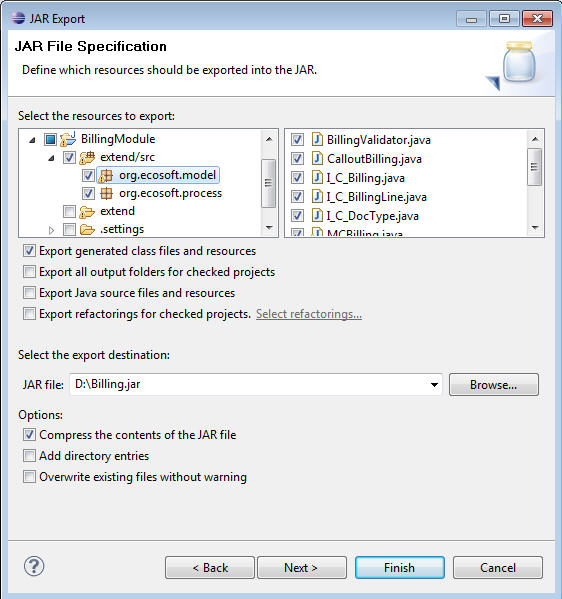
- From Eclipse, right click on BillingModule project --> Export --> JAR File, name the file "Billing.jar" and click next to export it
- Since this is a new package (work as separately as module), we can deploy them package folder. Deploy to ADEMPIERE_HOME\packages\Billing\lib\Billing.jar
- RUN_silentsetup .sh/.bat to include this new package into the application.
Note:
Adempeiere Precedence of JAR
- Customization.jar
- Patches.jar
<Package>.jar (i.e., LiberoHR.jar, LiberoManu.jar, etc…)- Adempiere.jar
Deploying as a new JAR
- Copy and Paste to Adempiere
- As customization.jar in C:\Adempiere\lib
- As
<Package>.jar inC:\Adempiere\Packages\<Package>\lib\<Package>.jar
- Execute Run_Setup.bat or RUN_SilentSetup.bat to include the new classes into the system runtime
Summary
As you will see now, ADempiere is a great tool to develop new Business Application. This sample module is utilizing most of the important techniques available in ADempiere and try to connect them together in a single tutorial. Yet, these are just the basic steps to understand ADempiere. I do highly recommended the reader to read though all the links provided in this tutorial.
If this tutorial has any typo error or is not clear enough, please do help me in suggesting any edits or by giving your feedback in the Discussion page. Thank you and have fun!